


Forms editor
The Forms editor is Silva's original text editor, which requires the use of a simple (HTML like) formatting language. The language is described in this guide, additionally there is onscreen help for formatting.
To reach the Forms editor navigate to the document you wish to edit.
Click on editor in the top navigation bar of the Silva management area, the option for the Forms editor will appear.
Click on forms editor. (Fig.1.)
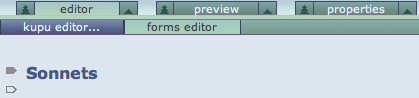
Fig. 1. Forms Editor
Editing a document
After a document is created or opened for editing in the editor, a screen appears with the title and two arrow symbols on the left side. (Fig. 1.)
The dark arrow is an 'edit' link
The open arrow is an 'insert' link
To insert some new text click on the open insert arrow. A drop down list appears with a choice of items to insert. (Fig. 2.)
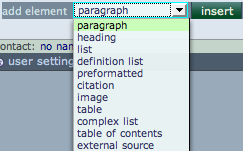
Fig. 2. Insert options
Text elements
Documents are structured by text elements. Since text is stored in
XML – which also has a tree like structure – this pattern is carried though to the smallest nodes of a Silva site. Scroll down for a detailed explanation of each text element.
Adding text
After selecting an option from the drop down list, click the insert button (alt-i), a box appears in which text can be entered and saved. (Fig. 3.)
There is onscreen help to show you how to markup text in the forms editor. (Fig. 3)

Fig. 3. Adding text in the Forms editor
Deleting and moving elements
On the right side of the Form Editing screen are delete and move arrows. (Fig. 4.) Clicking the 'X' deletes the element (there will be 'Really
delete'? alert).
Clicking the 'move down' or 'move up' arrows, elements
will be shifted one step.
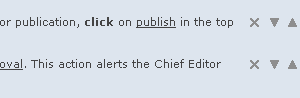
Fig. 4. Moving and deleting paragraphs in the Forms editor
Editing text and image elements
Paragraph
A paragraph is a block of text. You can simply type in the text, or when the text is already available you can cut and paste (multiple) blocks of text from other programs. Silva interprets an empty line as a signal to make a new paragraph. This means you can add multiple paragraphs in one step.
Heading
There are five types of headings; each one in the list is rendered successively smaller than the previous. A heading can always be changed to a paragraph (and back).
List
The standard list types (bullet, numbered, etc.) are created by changing the 'Type' setting.
Definition list
The text you are reading right now is part of a definition list. A definition term appears on a line by itself, followed by the term's definition.
Preformatted
Text in this element will be presented exactly as entered. Tags (such as HTML, XML, TAL, etc.) are not rendered and white space is preserved. In the rendered HTML a <pre> tag is used to format the text. This is useful to show code examples or command line statements.
Image
Placing a new image happens in two steps. In the first step the image must be uploaded in a Folder (local or elsewhere), where it appears in the 'Assets' area of the listing. After the upload return to the document you were editing. Step two involves placing a reference to the local image in the document. Select the image in the focus box, and click save and exit (or alt-e).
Formatting elements
Table
After choosing 'table' as element and clicking the insert button, a Table edit box appears. Columns can be added and deleted and the alignment set with the controls at the top, but this is easier if there are already rows inserted.
Click the insert symbol, and Silva will present a pull-down menu with options for two kinds of table rows.
Row: a normal row
Row heading: a row with headers, in which the text will be bold
With the controls at the bottom of the Table edit box, the style of the table can be set. The types are described in the select menu.
It's also possible to nest elements in table cells. Clicking the Nest element symbol brings you to a nested element editor. This works the same way as the normal editor, but has fewer elements available (e.g. it is not possible to insert a TOC). After adding elements you can return to the document by clicking the Edit parent symbol at the top.
Note: before clicking the 'nest element' symbol you should Save if you entered text in the edit box.
Complex list
Similar to a normal list, text can be entered in list items, but also other elements can nested, e.g. another list. Click the Insert item symbol to add a list item. If the list item is just text, enter it in the box. Clicking the Nest item symbol brings you to a Nested element editor, which works the same way as the nested element editor of tables (see above).
Table of Contents (TOC)
A TOC displays the titles of all documents in the current and underlying folders as links. Titles on lower levels are indented. Since the TOC is dynamic, new documents appear automatically. The depth of the TOC can be configured in the controls row at the bottom of the focus box.
External Source
Site Managers or developers can create an external source function. These can be used to add new types of structure or functionality to the document editor. All an Author needs to do is select an available external source and fill in any parameters required to configure the external source.
External sources can be SQL sources, which an be used to retrieve tabular data from relational databases using SQL, or code sources, which can be written in the full toolset that Zope makes available to developers. Other types of sources could also be created.
Making hyperlinks
Links to other documents in Silva can be added. The simplest way is to use the get link reference button. This will allow you to select the item you want to link to in a popup window and automatically inserts the right markup in the editor.
Links can also be entered manually, which is especially useful if you want special behaviour or want to link to an external site. See the onscreen help. (Fig. 3.)
Absolute Links or Relative Links
If it is likely that your publication may be moved, it is necessary to make relative links to documents inside your publication rather than absolute links. This means just having the links relative to the folder they are in, rather than giving the entire url relative to your site.
Creating index items
The Indexer will pick up Index items. An index will also be turned into an anchor in the HTML that is generated for a Document. Index items won't actually show up in the public document otherwise. You can see them in the editor however, as they will be highlighted in yellow. See the onscreen help. (Fig. 3.)
See also:
Importing spreadsheet data in the Forms editor
