


Assigning roles
Overview
The guide follows on from the Silva Roles and Permissions guide. Whilst it is the job of the Manager to add users to a Silva site, the Chief Editor assigns user roles throughout a Silva site. The first task is to determine which area of the site you wish to add roles to. In the following example we are adding user roles to a Publication. It is the same process for adding users to a Folder or Document. Remember, if you give a user a role in a Silva Publication they will have that role throughout the Publication. You could on the other hand give a user a role over one Folder or even just a Document in a sub folder of a Publication.
Adding roles
1. Configuring a Silva Publication, Folder or Document
Login to the Silva management area as Manager or Chief Editor.
Navigate to the Publication or (Folder or Document) you wish to add a user to.
Click on the access tab in the navigation bar at the top of the Silva Management Area. (Fig. 1.) This will take you to the user role managing area also shown in Fig. 1.
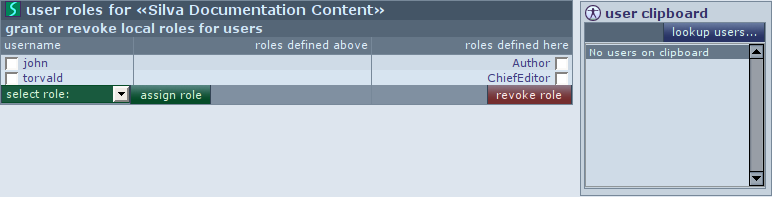
Fig. 1. User role managing area for a publication called Writers
2. Searching for users to assign roles
Click the lookup users button located near the top right of the screen. (Fig. 1.) This brings you to the user lookup form where users can be selected to place on the clipboard. (Fig. 2.)
In the user search form, type the name or part of the name of the user you want to find.
Click the search button (alt-s). The system will now list all users that match, with some extra information like an email address if available. (Fig. 2.)
Select the users you want to assign roles to during this session using the checkbox in front of their name. Then click the add to clipboard button. The selected users will now appear in the user clipboard area to the right.
You can now repeat this action and look up more users if desired, until all the users you want to assign roles to, are on the clipboard.

Fig. 2. User lookup form
Press the use clipboard button in the user clipboard area. You will now be returned to the Access screen with the selected users on your clipboard. (Fig. 1.)
You are now ready to assign roles to the users on your clipboard.
3. Assigning roles to users on the clipboard
The clipboard contents will be kept around until you log out. You can therefore use the same clipboard to assign a number of roles to a number of users in different locations. It is also possible to remove users from the clipboard in the lookup screen, by highlighting the user and pressing the remove user button (alt-r) in the user clipboard.
Select the user you want to assign a role to in the clipboard area to in the right column of the Access screen. It is also possible to select multiple users by using the shift or control keys when making the selection. (Fig. 3.)
When you are ready with the selection, select the role you want to assign to the user(s) in the drop down list at the bottom of the user clipboard. Press the assign button next to the role selection list. (Fig. 3.)
You have now completed assigning the role. You can repeat this step for other users on the clipboard if desired.
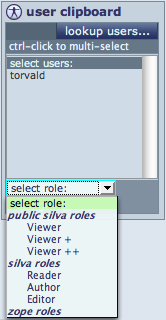
Fig. 3. Selecting roles for users
3. Assigning roles to a user with previously assigned roles
Users who already have roles assigned to them, possibly higher up in the site, will be listed in the user roles area in the middle column of the Access tab. Roles already assigned higher up in the site will be listed in the ‘roles defined above’ column of the user roles area. (Fig. 1.)
You can assign more roles to such users by selecting the checkbox in front of their user name. You can select multiple users if you want to assign the same role to them at once.
Then, select the role in the drop down list at the bottom of the user roles area. Press the assign role button next to the drop down list. You have completed assigning the roles to existing users.
4. Revoking roles from users
To remove a role from a user, go to the user roles area in the middle column of the Access tab. (Fig. 4.)

Fig. 4. Revoking a role from a user
You can only remove roles from users in the location where this role has been assigned to them. If the role has been assigned higher up it is not possible to remove the role in the lower location. If you have the right access, you can go up to the top Access screen using the up arrow in the tab or by using the sidebar, until you reach the point where the role is assigned.
You can revoke a role by using the checkboxes in the roles defined here column. (Fig. 4.) After selecting the roles you want to revoke, click the revoke role button below the checkboxes located in the lower right area of the user roles area.
You are now finished revoking the roles. If you revoke all roles from a particular user, the user won't be shown anymore in the user roles area.
The guide follows on from the Silva Roles and Permissions guide. Whilst it is the job of the Manager to add users to a Silva site, the Chief Editor assigns user roles throughout a Silva site. The first task is to determine which area of the site you wish to add roles to. In the following example we are adding user roles to a Publication. It is the same process for adding users to a Folder or Document. Remember, if you give a user a role in a Silva Publication they will have that role throughout the Publication. You could on the other hand give a user a role over one Folder or even just a Document in a sub folder of a Publication.
