


Adding content
To add content the same method is used, regardless of what type of content it is.
1. Log in to the Silva management area. By default you are in the contents screen. The contents screen is the area where new content is added. (Fig. 1.)
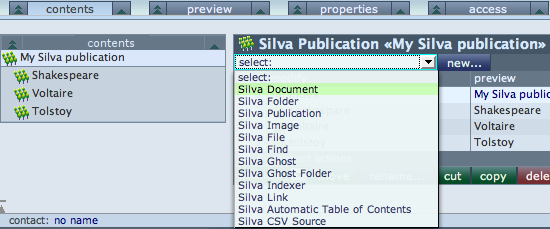
Fig. 1. Contents Screen
2. To add a document, click on the drop down select list. (Fig. 1.)
3. Select Silva Document from the drop down list. This will take you to the creation screen for a new document.
4. Fill in the id and title for the document and press save. The id field has limitations on what characters may be used for a valid id. If you include any disallowed characters, you will be informed and given an opportunity to re-try. The title field has no such limitations. It does not even have to be unique. The page title will appear in the new document at the top of the page.
Other types of content may be added by selecting a different option from the select drop down list. Click onto the new... button for an explanation of the different choices available to you in the drop down list. (Fig. 1.)
See also:
- the Kupu WYSIWYG (most popular) editor – similar to Word
- or Silva’s original Forms Editor
Silva has a set of handy access keys or keyboard shortcuts. To see a list of these shortcuts use the key combination alt shift and ? in any of the Silva management screens.
