


External sources: SQL, CSV, and Code Sources
This guide explains:
How to install an external sources product into Zope
How to add, customise and use a SQL Source in Silva
How to add, use and update a CSV Source in Silva
How to use a Code Source in Silva
Overview
Silva
has an External Sources extension that provides the ability to add data
from non-Silva sources to Silva Documents. These non-Silva, or
“external” sources, can for example be a relational database (e.g.
addresses, price-listings, course info, etc.) or the outcome of
executing a Python script (which could e.g. make an RSS feed available
for Silva Documents).
Since an External Source can potentially be resource intensive or expose a vulnerability, only users with ZMI
access (Zope Management Interface, usually the site Managers) can
create External Sources. The exception to this rule is a CSV Source
because its possibilities are limited. An Author can create a CSV
in the Silva management area. It is the Manager’s responsibility
to make sure no vulnerabilities are exposed to the Authors or the
public website. This does imply the site Manager needs to be
knowledgeable of both Silva and the External Source being accessed.
An
External Source added to a Silva site also offers the Author a set of
parameters (via a Formulator form) to aid layout of the External Source
within the Silva Document.
Installing the External Sources product into Zope and Silva
- Install the Silva External Sources product in your Zope. Unpack
the SilvaExternalSources tarball into your Zope instance at the
relevant Zope Products directory for the Zope installation. If
you do not have access to the Server ask your host to do this for
you. This first step cannot be done from the Zope management
interface.
- Restart Zope.
- As Manager, login to the Zope Management Interface.
- Go to your Silva Root instance. Click on the Services Tab in the top navigation bar. (Fig. 1.)

Fig. 1. Services Tab in the top navigation bar of Silva in the ZMI
5.
To make Silva External Sources work in a particular Silva root, it
needs to be activated in Silva. This is done in the service_extensions,
available in the Services tab in the Zope Management Interface of this
Silva root. Non-active extensions have a gray background and an install button. (Fig. 2.)
Scroll down and click into “service_extensions (Silva Product and Extensions Configuration)”.
Click activate in the SilvaExternalSources box.
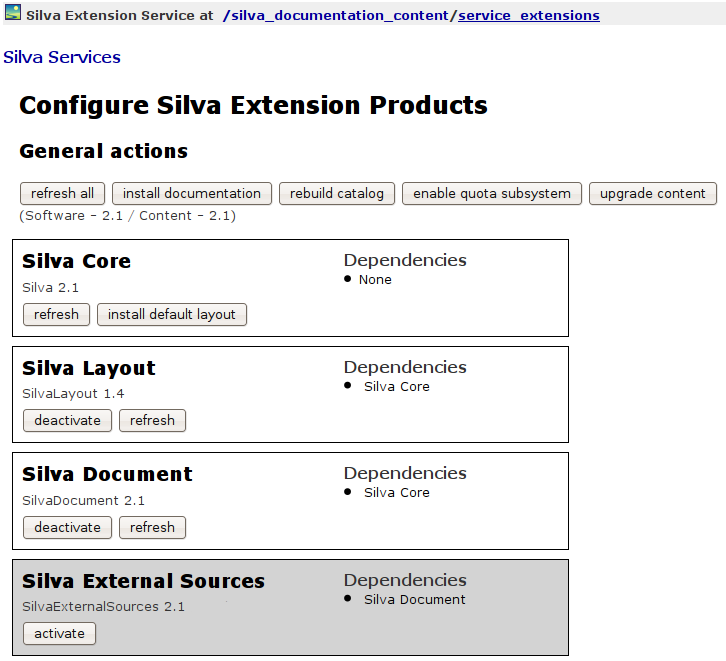
Fig. 2. SilvaExternalSources activiate button
Using an SQL source
The SQL Source enables the results of an SQL query to be presented in a table. Because of the security issues mentioned above, only Zope managers are allowed to create them. Once they exist, Authors can place references to an SQL Source into their documents.
Prerequisites
- A Zope adapter for a SQL database must be installed
- At least one SQL connection object must be visible/reachable from the Silva root
- Manager creating the SQL Source has to know SQL.
Adding an SQL Source
1. Go to the ZMI (Zope Management Interface) and navigate to the Silva root. (Fig. 3.)
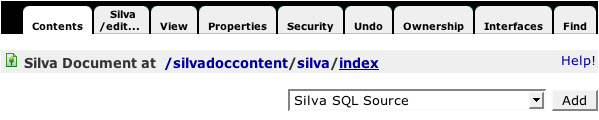
Fig. 3. ZMI contents area where you can add a Silva SQL Source
2. Select Silva SQL Source from the drop-down menu. (Fig. 3.) You will be taken to the Add SQLSource form. (Fig. 4.)
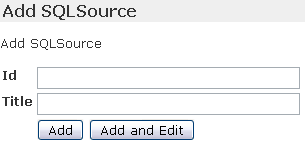
Fig. 4. Add SQLSource form
3. Fill in the id and title and press Add and Edit.
4. If the displayed SQL connection isn’t the one you want, choose a different one; check if the data encoding is the same as your database delivers; enter the sql statement you want to be executed.
5. Save the changes
6. Test the query via the Test tab.
If everything went well, the SQL Source can now be used in documents.
In a document, select External Source as the element to insert and choose the newly created SQL Source. Then press the update button next to the drop down list.
Customizing the SQL Source
In the form that appears the Author can adjust the appearance of the table to be displayed and can add a caption if needed.
The Edit tab of the SQL Source in the ZMI contains a link called edit parameters. With this link a Formulator form can be created and changed, which displays when the SQL Source is referenced from a document. Of course, one needs to know how to manage forms with Formulator – this is out of scope for this guide, but there is a HowTo available on zope.org. See also this Code Source HowTo that explains how to configure parameters.
Using a CSV Source
CSV
Source displays data that is uploaded in a format called ‘comma
separated values’. CSV is a plain text format where each line contains
a row of a table; the columns within a row are delimited by specific
characters, usually commas. We then have a tabular structure to present
to the viewer.
Something important to note
with the CSV Sources is the encoding of the data that will be uploaded.
For this guide it is enough to say that the encoding of the data
describes the way the characters are represented. Another difference is
that the parameter form shown when the CSV Source is referenced from a
document is not changeable.
Example:
When you save your spreadsheet as .csv, Excel uses one of the windows
encodings. For most European countries this will be ‘cp1252’. Of course
you have to know the name of the encoding before you upload the data.
In
the edit view of the CSV Source you can change the encoding after the
data was uploaded. If you experience strange visual effects, try
another encoding.
In the edit view you also can upload another file, which replaces the actual data, or apply manual changes to the data.
The most important aspect of CSV Sources is you can insert references to them so they display in documents.
See also: Adding a CSV Source to your Silva
Customizing a CSV Source
CSV
Sources behave like normal assets, so you can specify some parameters
that are attached to the document. For CSV Sources these parameters
consist of the table style to use and the number of rows to show if the
table is long and needs batching.
Using a Code Source
The
Code Source element is a feature for including dynamically generated
html into a document. It resembles a page template or Python script but
is a bit more complex.
Code Sources can only be created on the Zope level and need Manager rights. Here is a list of the steps to take:
- Open the Zope (ZMI) management screen and navigate to the desired Silva root, or the level in the site below which you wish to use it.
- Choose Silva Code Source from the dropdown menu.
- Fill in id, title, and a script id, then click the Add and Edit button.
- Click the Contents tab and add a Python Script or Zope Page Template, giving it the same name as the script id; enter your script.
- Save the changes.
- Test the Code Source via the View tab.
Now the Code Source can be inserted into a document.
The Edit tab of the Code Source in the ZMI contains a link called edit parameters. With this link a Formulator form can be created and changed, which displays when the Code Source
is referenced from a document. If the Code Source needs to have options, for instance to show a title or not, a form can be created that lists the options and allows the Author to make a choice.
Of course, one needs to know how to
manage forms with Formulator – this is out of scope for this guide, but
there is a HowTo available on zope.org.
See also:
- A Code Source HowTo that explains how to configure parameters.
