


Navigation tour
You’ll soon feel at ease finding your way round the Silva management area after reading this page.
Silva has two workspaces:
- the content management area for managing content and users (blue navigation)
- the authoring level for editing content (green navigation)
1. Content management area tour
When you login to Silva you arrive in the content managing area. The first screen you see is the contents screen. (Fig. 1.)
Horizontally across the top of the screen are the Silva navigation tabs. (Fig. 1.) The highlighted contents tab at the far left is the active tab.
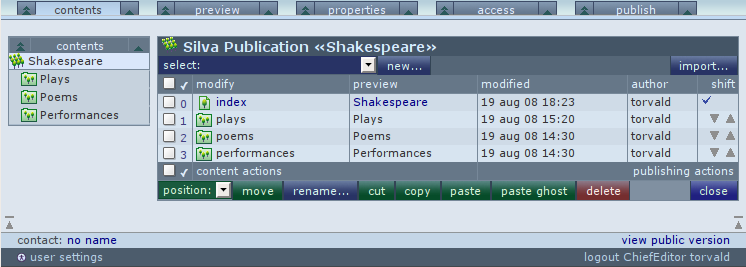
Fig. 1. The opening view of the Silva content management area of an existing website
Click on the various tabs at the top of your screen to have a look at the other management options.
- The contents tab: lists Documents, Folders and Publications. This is the first screen you see. New content is added here from the drop down select list.
- The preview tab: provides a preview of edited and saved content before publication.
- The properties tab: allows metadata to be added (detailed identification of the content).
- The access tab: the area for Chief Editors to set various permissions for users as well as variable access to content.
- The publish tab: where Authors submit content and where Editors approve and publish content.
Content listing headings
Looking at the contents screen (Fig. 1.), below the top navigation bar, the contents listing has the title of the Publication or Folder together with its icon. This area has the following columns.
The first column contains a checkbox for selection. Next to the checkbox is the position number of the item. Knowing the position is useful when moving an item with the move button. At the bottom there is also a ‘select all’ checkbox to select all items at once.
modify heading: shows the icon for the
item as well as the id of the item. The id appears in URLs (which the
public sees in links and the browser location field). These link either to the edit area if it is a Document or to the contents if it is a Folder or Publication.
preview heading: shows the title of the item, and links to the preview screen of the item.
modified heading: the date and time of the last modification, if the item is a document. If the item is a Publication or Folder ‘n/a’ (not applicable) is shown. The modified name has a downlink to the Properties screen.
author heading: displays the name of the last person who edited the item, and is a downlink to the Publish screen of the item. If the item is a Folder or Publication the text ‘n/a’ (not applicable) is shown. Content that is approved or published has a checkmark shown.
shift heading: contains an up and down arrow for reordering items.
Don’t try and memorize this – it’ll become second nature once you start working in Silva.
The sidebar
The Silva sidebar (Fig. 1.) is visible in all Publication and Folder screens. At the top of the sidebar you see the name of the screen that you are in. The sidebar shows the Folders and or Publications that exist in the Publication you are working in. Folders are shown unfolded and thus show any others inside them, but Publications are not unfolded. In order to see the contents of a Publication you need to enter it, and the sidebar is a quick way to do so.
When on the authoring level (such as a Document or Image edit. preview, properties, access, or publish screen) then the sidebar shows all the items in the current Folder or Publication. This makes it easy to edit a series of items in the container.
Navigation arrows
Look at the top navigation when you’re below the top level of the site and note the little
tree/arrows next to the navigation tabs. There are trees on both sides of the
contents, preview, properties, access and publish tabs, as well as on the sidebar.
Clicking on the small arrow takes you up a level in the same ‘vein’, thus if you’re in the properties screen it takes you up to the enclosing folder’s properties screen. The big arrow takes you up the vein to the top of the current publication. If you are already at the top of a publication that is nested inside of another, the big tree turns into a double tree that will take you up to the top of the parent publication.
Managing content
Silva is designed for managing a large document repository. It is assembled in a tree like structure made up of Publications, Folders and Documents. There is just one top but many descending branches.
As you build a site, a forest of trees develops. The icon for a Silva Publication is a forest, while the icon for a Silva Document is a single tree. This metaphor is carried throughout the user interface.
Roll your mouse over icons in your Silva site to
identify them, there are usually helpful instructions there. Here are some core Silva icons:
| The single tree icon is the symbol for a Silva Document. Documents are usually found in Folders and Publications. | |
| The three trees icon is the symbol for a Silva Folder. Folders usually contain documents. | |
| The forest icon is the symbol for a Silva Publication. Folders and Documents are usually in Publications. |
The order of publication items is manipulated in the contents screen. This determines the structure of the TOC (Table of Contents) which can be inserted in pages.
The ‘index’ document is always listed first and cannot be moved (the index doesn’t show up in the Table of Contents as it is assumed to contain a TOC).
Towards the bottom of the listing table (separated by a horizontal line) come assets. An asset is content that probably doesn’t appear in a TOC, such as images and file objects. If there are no assets this section does not appear. For more details see content organization.
See public version
Located in the lower right hand side of every Silva management screen is a see public version button. (Fig. 1.)
Click on this to see the published version of any page you are on. Use your back button to get back to the Silva management area.
2. Authoring area tour
To edit and add text and other items inside a document Authors work in the Silva authoring area.
To reach the authoring area, look
at Fig. 2. You will see details about the content located in the middle of the contents
screen. We see the name of the document
the date it was modified and the name of the author.

Fig. 2. Documents to edit are listed under the modify heading
Click on a document listed under modify to get to the editing area for that document. (Fig. 2.) In the example above, to get to the tree document, an Author would click on the word tree under the modify heading to reach to the editing area. (Fig. 3.)

Fig. 3. Silva’s editing screen. The navigation in the authoring workspace is green.
The Author clicks on new version and then the preferred editor loads, either the Kupu editor or the forms editor, and the Author can edit the document. Silva allows many versions of the one document so clicking on new version does not remove the published version.
3. Sidebars
Content management sidebar
There
is a sidebar available in most screens. When you’re in a folder or
publication, the sidebar displays links to the other folders and
publications in that area, much like the Windows explorer. The sidebar
only shows the content tree of the current publication, so if you leave
the publication and go either up a level or down into a nested
publication, the sidebar changes to show the folders of that one.
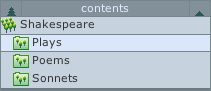
Fig. 4. Sidebar of the folder workspace, with the current location highlighted.
Authoring sidebar
When
you’re in the Authoring workspace the sidebar shows the neighboring
items in that folder. This allows you to move to the item’s siblings,
say from document to document, or document to image, etc., directly
with one click. Like the sidebar in the content management workspace,
the links stay in the same vein, so if you’re editing properties, the
sidebar links to the properties screens of the other items.

Fig. 5. The authoring workspace sidebar, showing the folder contents.
See also:
Adding content
Editing and adding text
Document versioning
Silva navigation part 2
Content organization
